
Introduction
Most people who work with microcontrollers know that JLink can be used to burn Hex files as an ARM simulation debugger. However, few may know that it can also be used to burn or read SPI flash memory. This article will introduce how to use JLink to burn or read SPI flash memory, with the JFlashSPI tool included in the JLink software package, which is a tool specifically designed for writing and reading SPI memory.
Preparation
- To burn or read programs on a flash chip, any SPI protocol flash can be used, such as W25Q128.
- The JFlashSPI software tool is required, which can be found in the installation directory of the JLink software series.
- Additionally, a JLink V9 emulator is needed
- The file to be burned, such as a GBK font library file or UNIGBK.BIN.
Hardware Connection
JLink is internally integrated with the SPI protocol, and some interfaces are used as SPI multiplexing functions. The specific hardware connections are shown in the following figure:
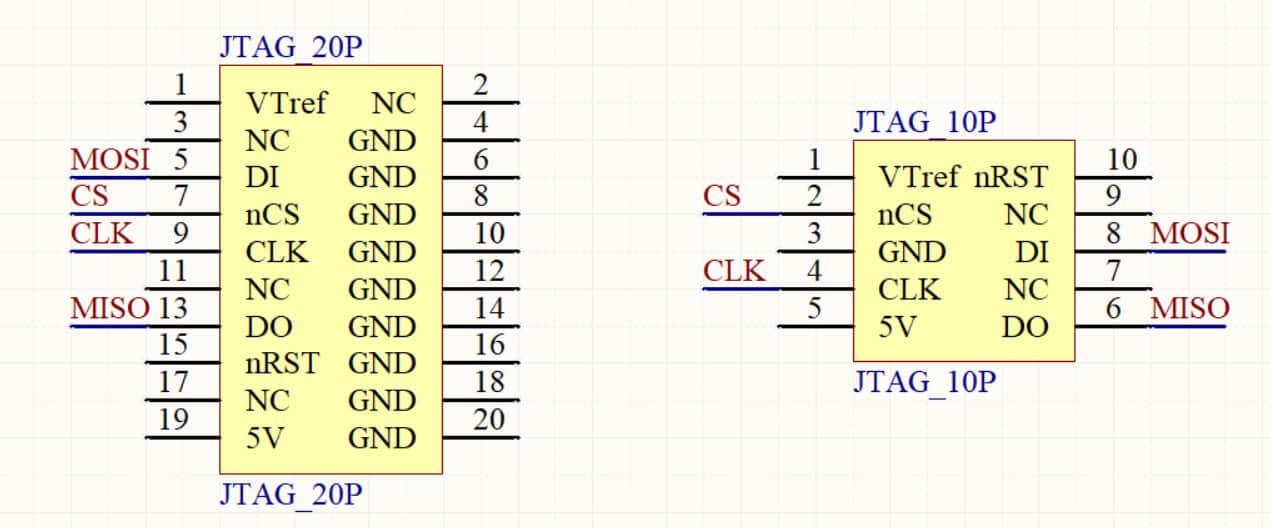
| Pin Number | Name | Input/Output | Connection to SPI Flash |
|---|---|---|---|
| 5 | DI | Input | Connect the MOSI pin of the SPI Flash |
| 7 | nCS | Output | Connect the CS pin of the SPI Flash |
| 9 | CLK | Output | Connect the CLK pin of the SPI Flash |
| 13 | DO | Output | Connect the MISO pin of the SPI Flash |
| Pin Number | Name | Input/Output | Connection to SPI Flash |
|---|---|---|---|
| 2 | nCS | Output | Connect the CS pin of the SPI Flash |
| 4 | CLK | Output | Connect the CLK pin of the SPI Flash |
| 6 | DO | Output | Connect the MISO pin of the SPI Flash |
| 8 | DI | Input | Connect the MOSI pin of the SPI Flash |
One thing to note here is that the first pin of the authentic JLink emulator is an input pin that requires an external reference voltage level. However, most JLink emulators currently available are the educational (pirate) version, where the first pin is not an input but an output of 3.3V. Therefore, this pin can be directly used to supply power to the SPI Flash.
1. Opening
There are two tools available: JFlashSPI.exe, which is a graphical tool, and JFlashSPI_CL.exe, which is a command-line tool. In this article, we will focus on the graphical tool, JFlashSPI. To open JFlashSPI, navigate to the installation directory of the JLink software and double-click on JFlashSPI. The interface of JFlashSPI is similar to that of JFlash, which was introduced earlier.

2. Connecting to the SPI Flash chip
Click on Target -> Connect. If the connection is successful, the connection information will be displayed at the bottom, which includes the model, manufacturer, and Flash ID of the Flash chip.
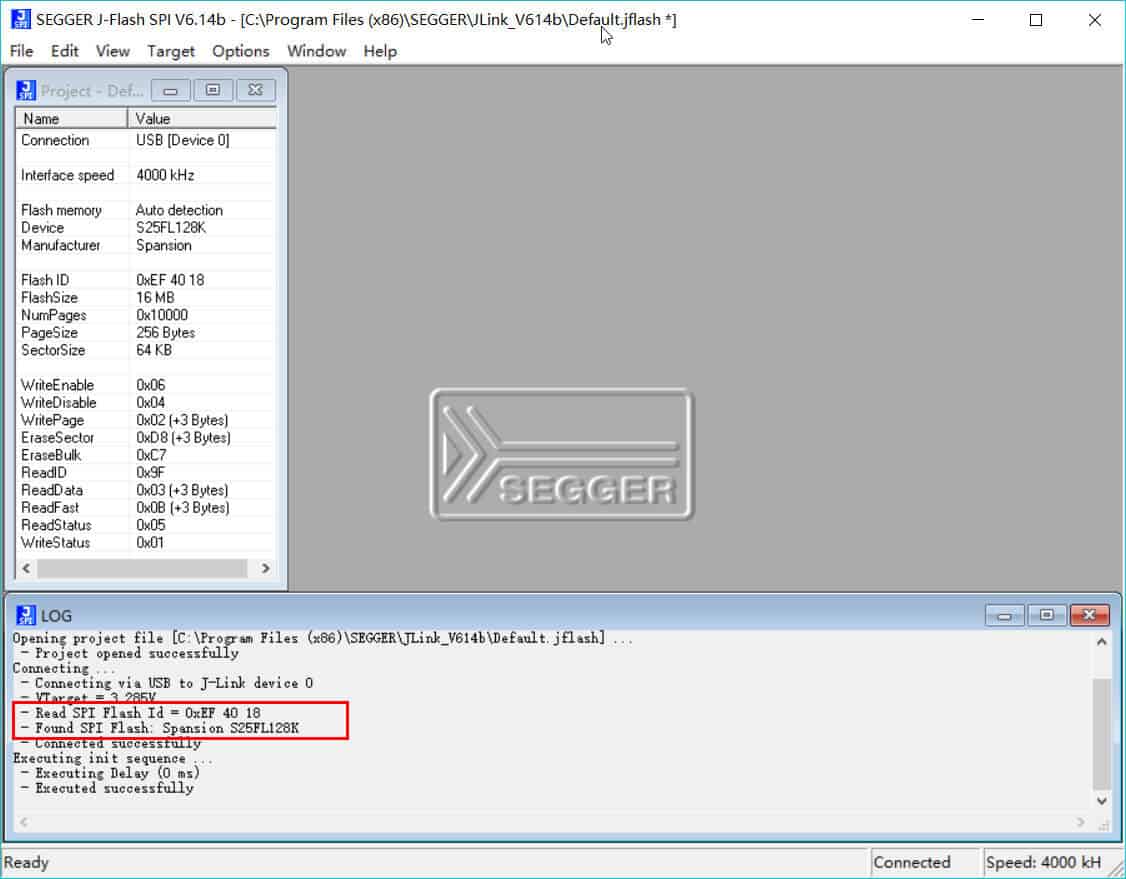
For example, in the case of my Flash chip, the silkscreen clearly says it’s a Winbond W25Q128, but the JFlashSPI reads it as a Spansion S25FL128K. Could this be a counterfeit chip?
3. Opening program file
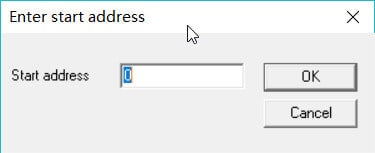
Click on File -> Open data file to open the font library file to be written. JFlashSPI supports multiple file formats. Since we selected a Bin file that doesn’t have a starting address, we need to manually enter the starting address for writing. We can simply enter “0” here.

4. Downloading
Click on Target -> Auto Download to download the program into the Flash chip.

After the download is completed, the bottom window will display a message indicating the successful download. It can be seen that the writing speed is quite fast. For example, a 170KB font library file was written in less than 1 second.

5. The reading of program files
Just like reading and writing single-chip programs, it is also possible to read the program from SPI Flash chips. In order to respect the intellectual property of others, the information provided here is for learning purposes only and should not be used for commercial cracking purposes.
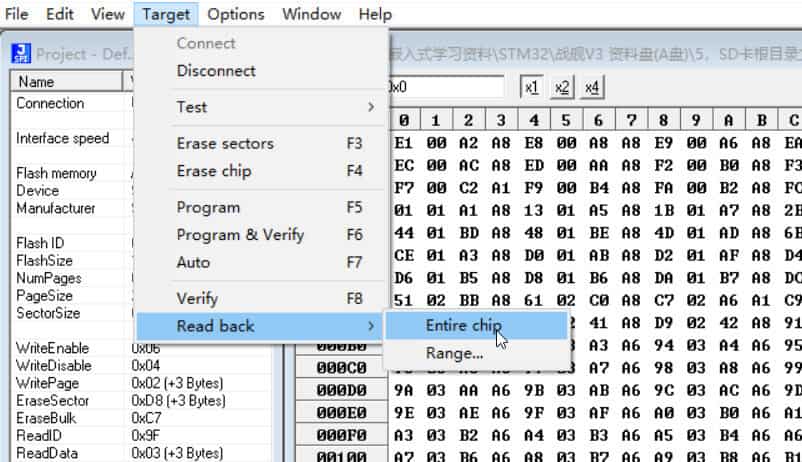
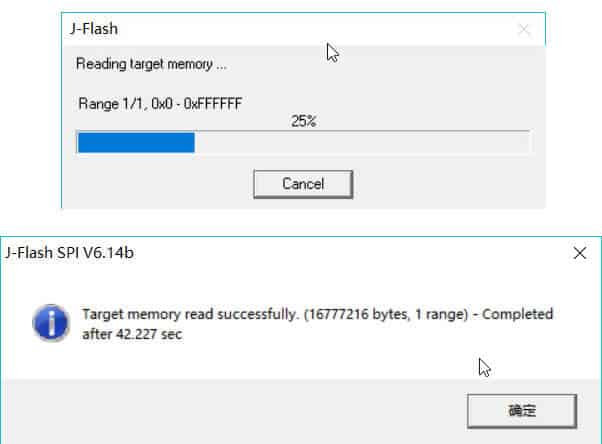
As can be seen, compared to downloading, the read/write speed is significantly slower because the entire 16MB storage area is being read, so the process will take relatively longer.
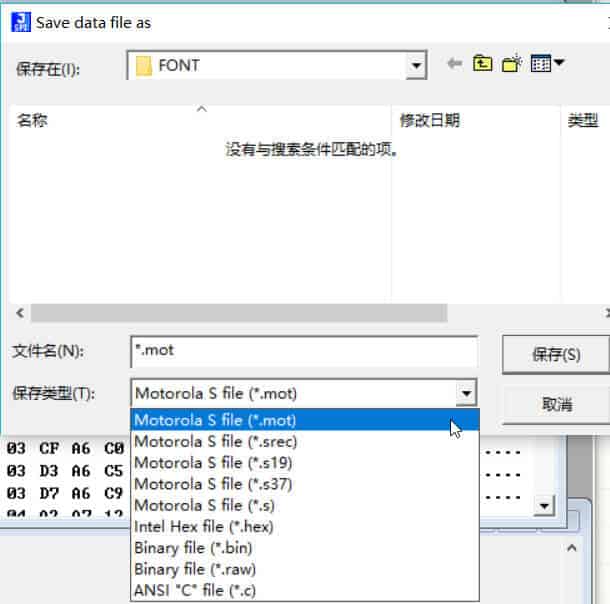
6. Saving the program file
Once the program file is read, you can choose to save the file to a local directory, and the file format can be selected according to your needs.
7. Use of command line tools
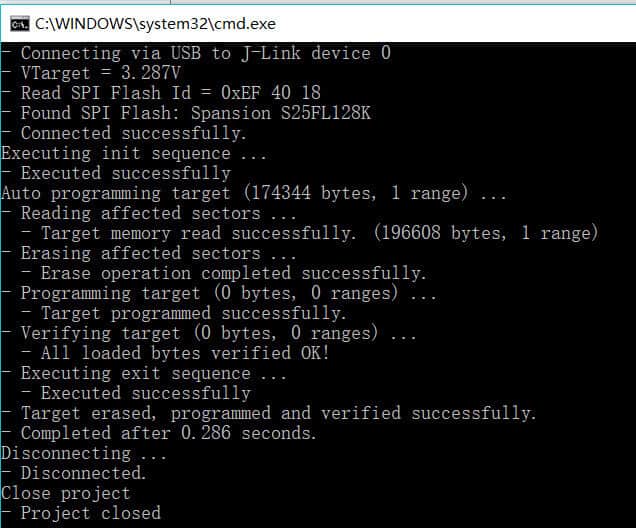
To use JFlashSPI_CL.exe, you can run the command “./JFlashSPI_CL.exe” in the terminal to see some helpful information, including the command instructions.
Running ./JFlashSPI_CL.exe in the terminal will display some helpful information, which mainly explains the commands:

You can see the -connect command for connecting, -open for opening the file to be programmed, and -auto for programming. If you want to program the flash, these three commands are enough. First, copy the file to be programmed to the same directory as JFlashSPI_CL.exe, then enter the command:
./JFlashSPI_CL.exe -open UNIGBK.BIN 0 -connect -auto
As per your previous message, you have successfully written the data to the SPI flash using the JFlashSPI_CL.exe command-line tool.

For convenience, we can write the above command as a batch command and run it directly by double-clicking.
Create a download.bat file, open it in notepad mode, and type the following
JFlashSPI_CL.exe -open UNIGBK.BIN 0 -connect -auto echo Program burn finish! pause
Then put the bat file and the font file to be burned into a folder. Double-click directly run can directly write, is not a lot convenient?
Speed Note
For different models of Flash chips (Localization & Demand Resonance: A Turning Point for MLCC), the maximum write speed of the J-Link flash programmer varies. Here are some references:
| Flash Device | Programming Speed | Flash Device | Programming Speed |
|---|---|---|---|
| ISSI IS25LP128 | 500 KB/s | Micron N25Q128A | 270 KB/s |
| ISSI IS25LD040 | 100 KB/s | Micron M25P10 | 160 KB/s |
| ISSI IS25LQ080 | 340 KB/s | Micron M25PX16 | 230 KB/s |
| ISSI IS25CD010 | 100 KB/s | Micron M45PE10 | 230 KB/s |
| ISSI IS25CQ032 | 190 KB/s | Micron M25PE4 | 215 KB/s |
| Macronix MX25L3235E | 285 KB/s | Spansion S25FL128 | 410 KB/s |
| Macronix MX66L1G45G | 430 KB/s | Spansion S25FL116K | 265 KB/s |
| Macronix MX66L51235F | 315 KB/s | Winbond W25Q128FV | 340 KB/s |
Reference: J-Flash SPI
JLink Software Download: Download Link


