When files are lost or damaged on Windows 10, you can use the DISM (Deployment Image Servicing and Management) and SFC (System File Checker) commands to fix the issue.
On Windows 10, the Deployment Image Servicing and Management (DISM) tool is designed for administrators to prepare, modify, and repair systems, including Windows Recovery Environment, Windows Setup, and Windows PE (WinPE). It can also be used with local recovery images to address system issues.
The System File Checker (SFC) tool can replace missing or corrupted system files using a recovery image. The only caveat is that if one or more system files in the local image are damaged, the SFC command won’t work. You can use DISM and the ‘install.wim’ image file to repair the image, then use the SFC tool to fix the setup without reinstalling the operating system.
How to use DISM to repair the image of WINDOWS 10
The DISM command tool includes three options: CheckHealth, ScanHealth, and RestoreHealth, which we typically use sequentially. The RestoreHealth option can utilize different source files.
The CheckHealth option of the DISM command
The CheckHealth option is used to determine any corruption in the local image of Windows 10 but doesn’t perform any type of repair.
Steps to check the image of Windows 10 using DISM:
- Search for ‘cmd’ in the bottom left corner, right-click on the top result, and then choose the ‘Run as administrator’ option.
- Enter the following command to perform a quick check: DISM /Online /Cleanup-Image /CheckHealth
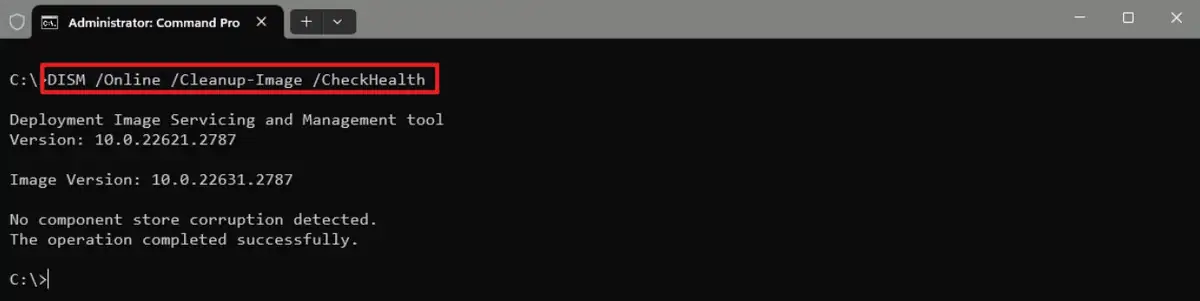
The DISM tool will run and verify any data corruption that might require repairing in the local image.
The ScanHealth option of the DISM command
The ScanHealth option performs a more advanced scan to determine if there are any issues with the image. Here are the steps:
- Search for ‘cmd’ in the bottom left corner, right-click on the top result, and then choose the ‘Run as administrator’ option.
- Enter the following command to perform an advanced DISM scan: DISM /Online /Cleanup-Image /ScanHealth
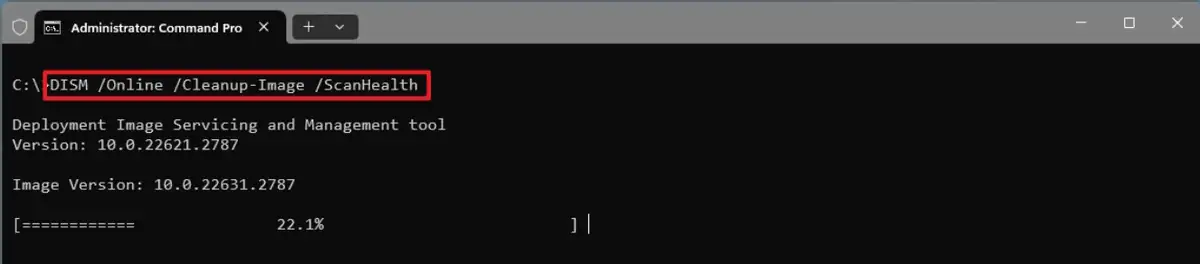
After completing these steps, the scan may take some time to check if the image requires any repairs.
The RestoreHealth option of the DISM command
If there are issues with the system image, use DISM with the RestoreHealth option to automatically scan and repair common problems. Here are the steps:
- Search for ‘cmd’ in the bottom left corner, right-click on the top result, and then choose the ‘Run as administrator’ option.
- Enter the following command to repair the Windows 10 image: DISM /Online /Cleanup-Image /RestoreHealth
Note: If the command appears to hang, this is a normal occurrence.
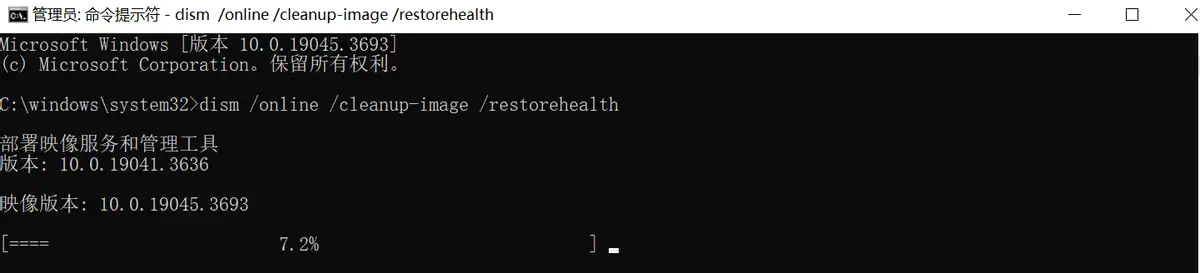
After completing these steps, if necessary, DISM will connect to the Windows server, download, and replace the corrupted files.
When using the install.wim file as a source
The DISM command usually runs without issues. If DISM encounters problems while replacing corrupted files or if the computer isn’t connected to the internet, you must use the ‘Source’ option to provide another system image file. Typically, you can use the ‘install.wim’ or ‘install.esd’ file from another device, installation disk, or ISO file. Just ensure the file matches the version and language you are attempting to repair. If you need other file sources, you can use the Media Creation Tool to download Windows 10.
Steps to download Windows 10 ISO file:
- Open the Microsoft support website (Download Windows 10 [microsoft.com]).
- Click on the ‘Download now’ button.
- Double-click on the MediaCreationToolxxxx.exe file to launch the installer.
- Click the ‘Accept’ button to agree to the terms.
- Choose the option ‘Create installation media for another PC (USB flash drive, DVD, or ISO file).’

- Click on the ‘Next’ button.
- Click ‘Next’ again.
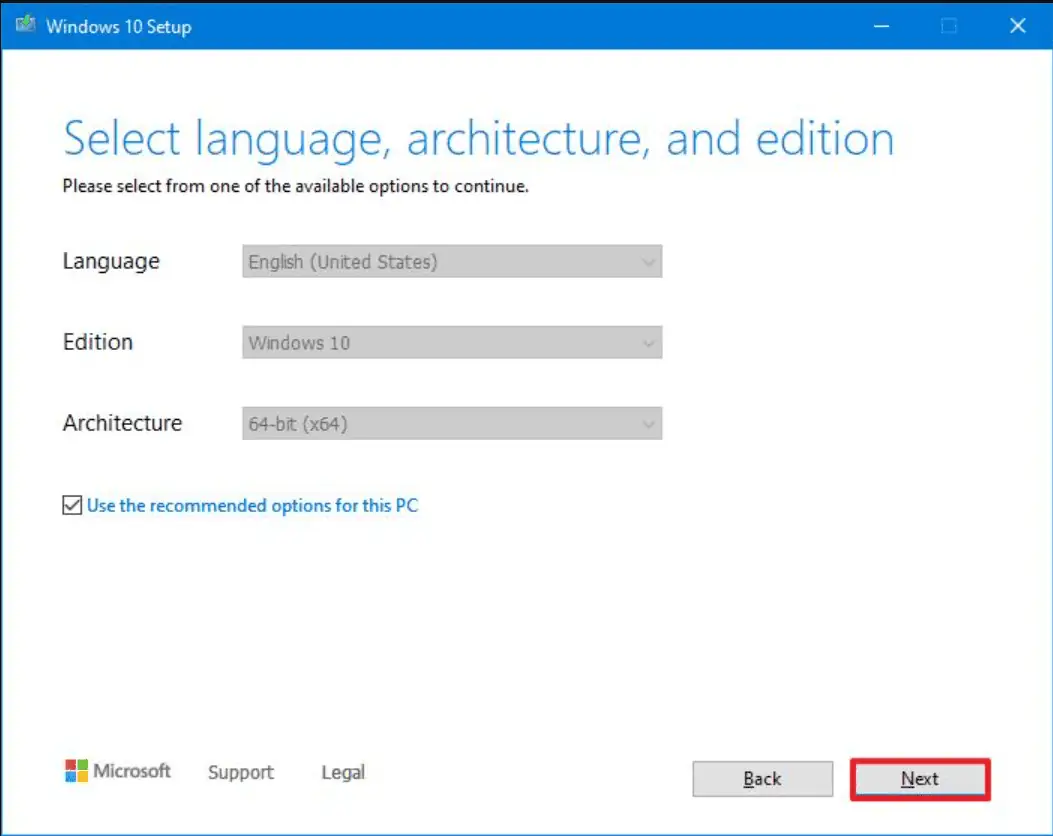
- Select the option for the ISO file.
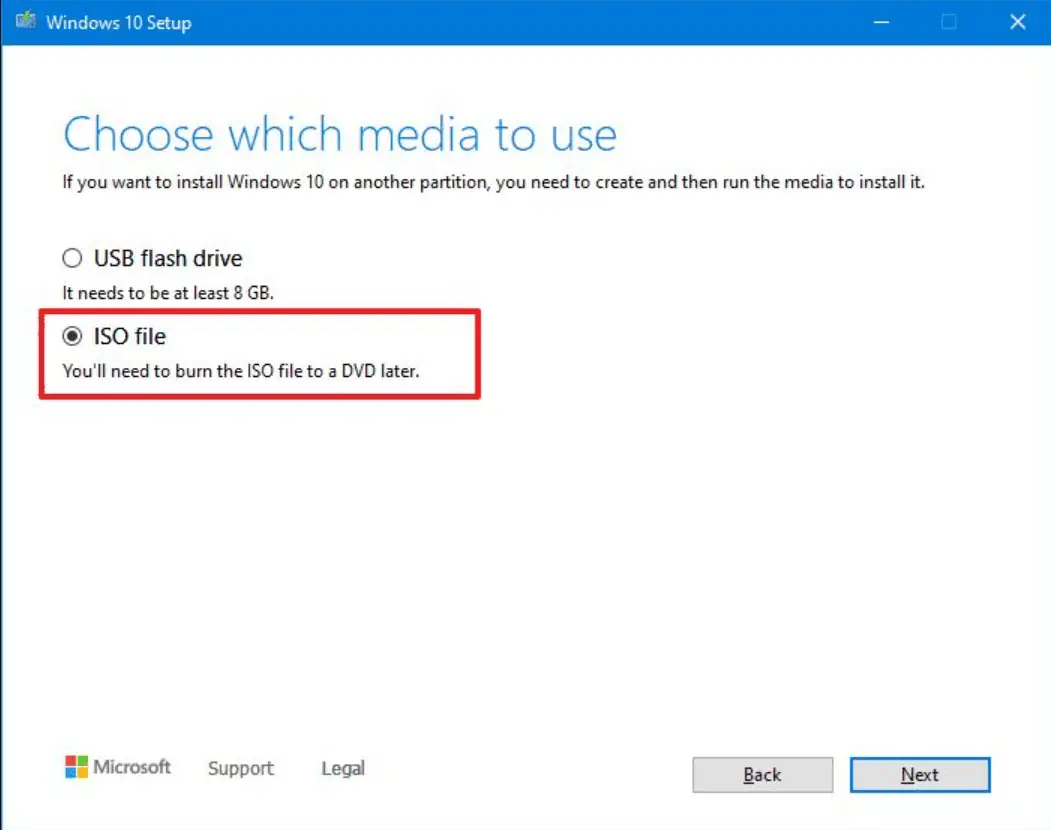
- Click on the ‘Next’ button.
- Choose the destination to store the Windows 10 ISO file.
- Click on the ‘Save’ button.
- Click on the link to open the file location in File Explorer.

- Click on the ‘Finish’ button.
- Double-click the Windows.iso file to mount the image.
- Under the ‘This PC’ section, verify the drive letter for the mounted ISO file.
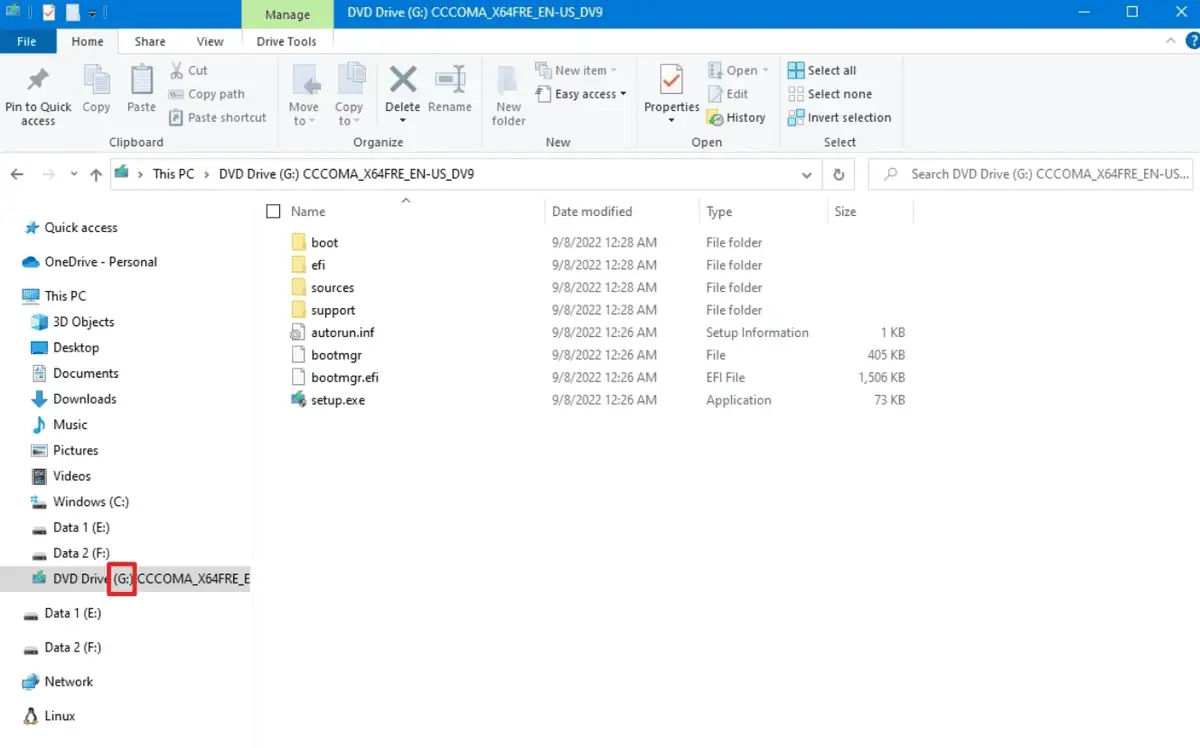
After completing these steps, proceed to use the DISM tool again with the ‘Source’ option to repair the local image.
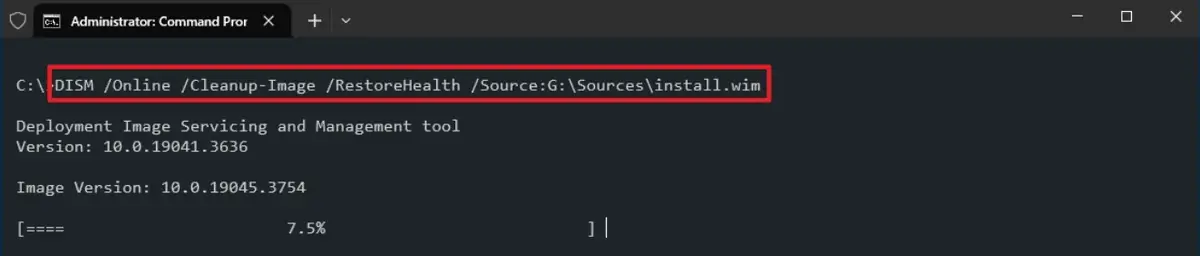
Steps to run DISM for repair using the install.wim file:
- Search for ‘cmd’ in the bottom left corner, right-click on the top result, and then choose the ‘Run as administrator’ option.
- Type the following command: DISM /Online /Cleanup-Image /RestoreHealth /Source:G:\Sources\install.wim
Note: In the command, replace ‘G’ with the drive letter of the mounted point in File Explorer.
- (Optional) Type the following command to restrict the use of Windows Update: DISM /Online /Cleanup-Image /RestoreHealth /Source:G\Sources\install.wim /LimitAccess
- Alternatively, you can use the following command: DISM /Online /Cleanup-Image /RestoreHealth /Source:wim:G:\Sources\install.wim:1 /LimitAccess
Note: In the command, replace “G:\Sources” with the path to the “install.wim” file.
After completing these steps, the command will scan and repair issues using the specified “install.wim” file set as an alternate source.
Steps to repair using an ESD file as the source:
- Search for ‘cmd’ in the bottom left corner, right-click on the top result, and then choose the ‘Run as administrator’ option.
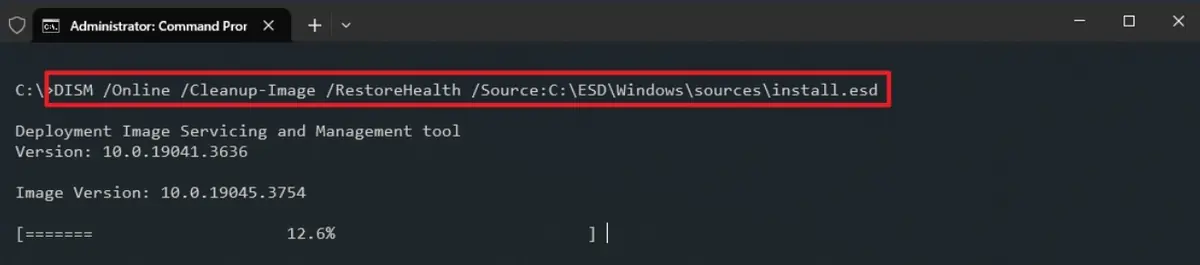
- Type the following command to repair the image using the ‘install.esd’ file: DISM /Online /Cleanup-Image /RestoreHealth /Source:C:\ESD\Windows\sources\install.esd
Note: In the command, replace ‘C:\ESD\Windows\sources’ with the path to the ‘.esd’ file location (if different).
- (Optional) Type the following command to restrict the use of Windows Update: DISM /Online /Cleanup-Image /RestoreHealth /Source:C:\ESD\Windows\sources\install.esd /LimitAccess
- Alternatively, you can use the following command: DISM /Online /Cleanup-Image /RestoreHealth /Source:esd:C:\ESD\Windows\sources\install.esd:1 /LimitAccess
- (Optional) Type the following command to use the install.esd file located on another drive, then press Enter: DISM /Online /Cleanup-Image /RestoreHealth /Source:E:\Sources\install.esd
Note: In the command, replace “E:\Sources” with the path to the location of the “install.esd” file.
After completing these steps, the tool will use the files contained in the “install.esd” image to repair corrupted files.
How to run SFC to fix issues on WINDOWS 10
The previous set of steps aimed to fix issues with the system image rather than problems on Windows 10. After restoring the image to its normal state, you can use the System File Checker (SFC) command tool to repair the current settings of Windows 10.
Steps to repair the system using the SFC command tool:
- Search for ‘Command Prompt’ in the bottom left corner, right-click on the top result, and then choose the ‘Run as administrator’ option.
- Type the following command to repair the installation: SFC /scannow
Note: If errors are found, you may need to run this command approximately three times to ensure that everything is correctly repaired.

After completing these steps, the System File Checker tool will use the local image file to repair system files. Log files will be saved in ‘%windir%/Logs/CBS/CBS.log’ and ‘%windir%\Logs\DISM\dism.log’, where you can review these files for more detailed information about the process.

Related:


